Today Alexandra wanted to do some more activities so I thought it would be a fun art day. She loves painting and this is definitely something we need to do when Camden is down for a nap! So after attempting to put him down (three times) he finally fell asleep and he slept just long enough for us to do a few painting projects.
Car Painting
The first one we did was car painting. This was an idea I saw on Pinterest. Alex loves cars and she loves painting so it was win-win! I put out some tempera paint onto paper plates and laid down some freezer paper and away she went. I really got the freezer paper to use for making appliques in sewing but I found it works really well for the arts and crafts we do. I love that there is a shiny side on the bottom so if she uses gobs of paint in one spot it won't rip through the paper.
I demonstrated how to paint with a car and away she went (making varoooooom noises with every push and pull of the car!)
Grape Painting
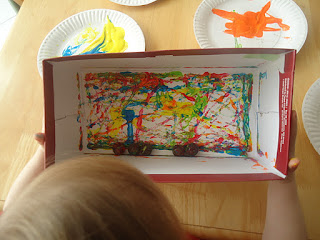
Next we did a take on marble or ball painting. When we were at the Harvest Festival in my hometown in September there was a craft stand and Alex was able to do this fun and free activity. I loved it because it kept the paint contained in a box. And when I said we did our take on it, well, we didn't have any marbles...but we did have grapes! So we used grapes and of course she knows (and just to make sure I told her) that we can't eat these grapes!
In case you've never done this before here is how you do it:
Step 1: get a box (I used a shoe box but it is probably better to use a bigger box or a lid of a bigger box.) Tape the paper in the bottom of the box. Put some paint either on a plate or in a plastic container and put a grape (or whatever sphere you are using!) into the paint.
Step 2: Dump the colored grape into the box and move it all around! Do this with each of the colors. At the end we just added all of the grapes in and went crazy!
Here is the finished product! Colorful and really not all that messy!
Bubble Wrap Painting
For Bubble Wrap painting I first squirted blobs of paint onto our craft cookie sheet.
Next, I had Alex use a paintbrush and paint the cookie sheet and mix the colors . Then I cut a piece of bubble wrap the size of the cookie sheet and had her press it down gently (bubble side down!)
Then, lift up the bubble wrap, again, gently unless you want to wear all of the paint!
You can't see it because of her arm but here she is saying "whoaaaaaaaaaaa, awesome!!!!!"
I cut out letters for her name and she used bubble wrap to make the print beside her design.
And finally she painted a ceramic piggy bank that my mom got her as a gift. It's a colorful pig to say the least! She was very proud of it. So proud of it in fact, that the pig is now resting with her on the blanket on the floor. And I'm sure it will be in her bed tonight too.


1 comments:
What an array of ways to paint! I should have used a grape to do my salad spinner painting!
Post a Comment